Edit Quality Videos on your Phone with the Spark Camera App


Our smart phones are getting even smarter, allowing us to create quality videos anywhere, with faster speeds and without the hassle of having to carry a ton of camera equipment.

Whether you want to jazz up your home videos, send a fun message to your social media followers or quickly block a complicated scene, there’s never been a better time to get your ideas out into the world than right now.

So now that you have the ability to shoot great content, you need to know how to make your footage really come to life “in the edit.”  And you can do all of this with your phone, with the Spark Camera app.

Spark Camera

Spark is an extremely user friendly and quick to learn app.  You can shoot video, edit your video, add music to your video and export it all in one convenient place: right in the palm of your hand.

How to Get Started

First things first, go to the App Store, type in SPARK CAMERA and click the download button (it’s only 99¢ and worth every penny).

Once you are in the app, it will ask you to create a new ‘spark’ (a video).  Click yes and you’re off!

There are two ways you can use the app:

1) Record a new video from scratch
2) Choose an already shot video from your phones photo library

To record a new video from scratch:  Point your camera at your subject, hold your finger down anywhere on the screen and that’s it.  Once you release your finger, the video stops recording.

You also have the choice of four different frame rates in which to record:

30 fps (frames per second)
60 fps
120 fps
240 fps

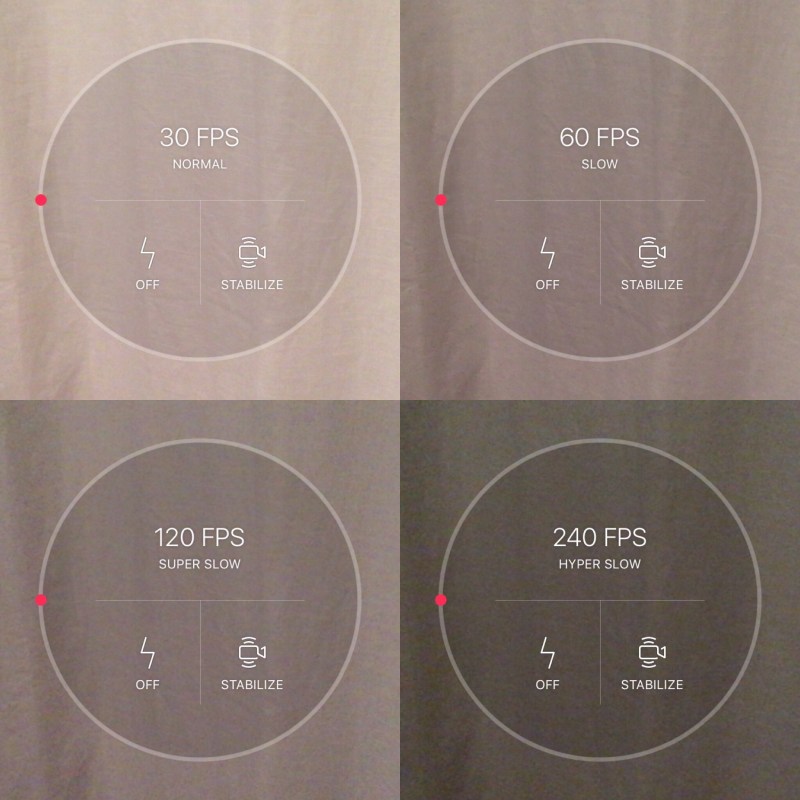
The higher the frame rate, the slower your video will be when you play back.  So if you want your video to feature slow motion, you can choose either 120fps or 240fps (depending on how slow you want it.)

TIP:

  • For cleaner, crisper videos (outside of the Spark App) you should set your phones to shoot in 60 fps. Go to your phone settings > Phone & Camera > and click the RECORD AT 60 FPS button to ON

To create a video from an existing video in your photo library: Go to the main screen in SPARK and click the “+” button.  You’ll quickly be navigated to your Camera Roll folder in your photo library. (See below)

IMG_6669

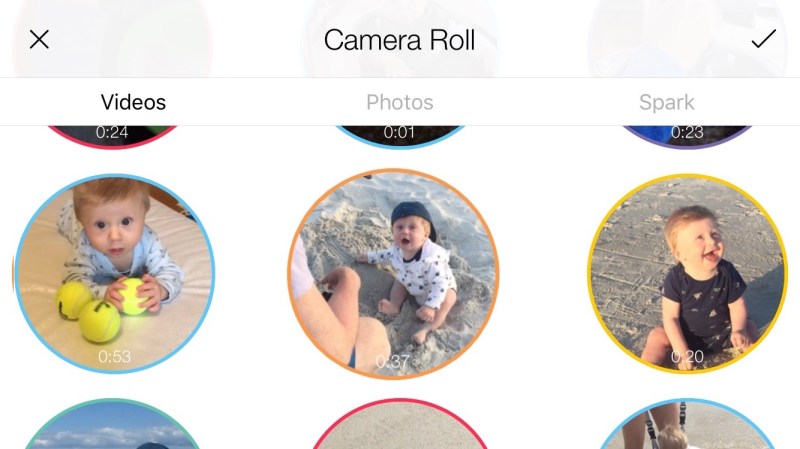
There you choose which video(s) you want and can even trim the selected video to the length you want it (ie, cut the unnecessary fat).

Now that you have your clips selected, the real work can begin.

EDITING YOUR CLIPS


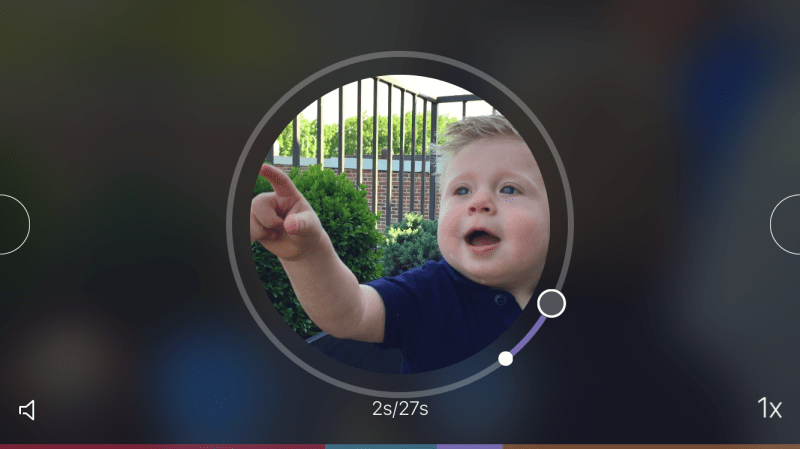
To start, click on whichever clip (the different colored circles on the bottom of the screen) you want to edit first.  The video will take up your screen and you can trim your clip to your desired length by dragging the small cursor circle back and forth the outer circle.

You can also add a transition between your clips by clicking the semi-circle to either side of your selected clip.

If you want to move your clips around the “timeline” in the order you want, simply press and hold the clip and move it were you would like to.

Adding Music

You can also add music from your phones library by clicking the “musical note” in the top left corner of the screen and adjust the levels to how you see fit.

Export!

Once you’re done with your video and everything is exactly how you want it, you can export your video!  Click the right hand corner of your screen to go to the export menu where you can save a copy of your spark as a complete video to your photo library, share it on Instagram (and tagging SPARK while you’re at it), sending your video as a postcard or sending in a text or email.

Video Examples

Here’s a video from our web series, “Judged By Paxton” which was shot on an iPhone and edited with Spark a few years ago:


And here’s an example of turning a few home movies into one fun, energetic clip: “Quad”


Upload your Spark App videos to Instagram and tag us @royalpiranha –  We want to see what you’re creating!


RELATED ARTICLES:

“How To Shoot Stylish Videos with Your Phone”

How to Produce a Kickstarter Campaign Video that Sells


Kickstarter is a great way to give legs to a  business idea that you’ve been sitting on due to lack of money.  It allows you to create campaigns to raise funding for your projects.  Anyone who has had a successful campaign will tell you a good Kickstarter video is KEY. Kickstarter themselves even state that projects with a video have had a 50% success rate, compared to a 30% success rate to those that didn’t include one.

How to Make a Killer Kickstarter Video


4 THINGS TO INCLUDE:

  • (1) Introduction of yourself
  • (2) Tell you audience about your project
  • (3) Explain why you are launching this campaign and why people should care
  • (4) List rewards you are offering to backers of your project

IMPORTANT THINGS TO KEEP IN MIND:

  • It’s usually better to “show” instead of “tell” when you are creating a video. For instance, instead of listing off a bunch stats, it’s better to include a graphic with the information. Create a script or breakdown of what you want to say in the video. Then go back line for line and ask yourself, ‘How can I depict this visually instead of saying these words?” This will not only create a more engaging video, but will shorten the duration of it as well.
  • You want a lot of different shots that you can cut to within your video.  The more footage you shoot, the better.  Having a lot of cuts will keep the audience engaged. There’s nothing worse than watching someone talk straight to the camera longer than a few seconds.
  • Keep all your pictures, graphics and music copyright free. (This one is a Kickstarter rule) There are plenty of free content out there on the web. Just Google 🙂
  • The best videos will be no longer than 3 minutes. I promise you, you can tell your whole story in 3 minutes. If you can’t, hire someone to help you edit you ideas down.
  • Pick music that reflects the lifestyle of your project. When editing the music into your video, raise the audio levels when you are just looking at footage and fade the levels down when someone is speaking.
  • Seal the deal with a “call to action.” Here you are calling people to take action and fund your project. Connect that with a reason why they would want to fund you, what’s in it for them? You can connect your call to action with your rewards or incentives you are offering backers.

Here’s a Kickstarter video we created:

Drop us a line and get jump started on your Kickstarter video today!


A Royal Piranha Profile: John Wyatt Haskell , NYC Comedy Writer

“So even if I was getting stuff on TV which was seen by millions, it wasn’t 100% “my own” creation or voice.  So, that’s probably why I continued to make things online.” 


10523835_849629947860_6375481074830879835_n

John Wyatt Haskell

Is a New York City comedy writer who formally wrote sketches for the Tonight Show with Jimmy Fallon.  Currently he is in Los Angeles, where he is writing for the new  Sarah Silverman show on Hulu.

Anyone who knows Haskell will tell you he’s one of the most endearing people they know.  They fall in love with his refreshingly impulsive and honest sense of humor.  He has a contagious laugh and a childlike goofiness that just makes you giddy when you’re around him.

Besides the fact he’s just plain FUN to talk to, we wanted to chat with him to find out  what drives him to continue to create digital content for himself even when he’s busy working on some high profile shows.


RP: How would you describe the digital content you create for yourself?

HASKELL:

I’d say the content I create is usually very impulsive, or done in a stream-of-consciousness style.  I’ll typically have an idea then act on it right away – maybe it’s a small photoshop, or a little video.  This process has its pluses and minuses.  On the plus side, I make a lot of stuff.  On the minus side, sometimes it’s not as good as it could be.  Oh well, hehe.

RP: As a writer for a nationally televised show, you were getting your work out there on a daily basis, why do you feel the need to create online content for yourself?

HASKELL:

This is an interesting question.  I guess it’s because if you’re a “creative” person – whether it’s comedy, music, art, etc. – you probably have some drive in you to make things that are your own.  So even if I was getting stuff on TV which was seen by millions, it wasn’t 100% “my own” creation or voice.  So, that’s probably why I continued to make things online.

RP: What do you think the hardest part about creating digital content is?

HASKELL:

That’s another interesting question.  I mean, I think online content is easy to create, because you don’t need to book a show or schedule anything to do it.  You can just make something and post it.  But I guess one tricky thing is that there’s so much online content out there now, sometimes it might seem like you’re just throwing something out into a void.

RP: How have your own personal projects helped you in the actual workforce?

HASKELL:

Sometimes my own personal projects led to ideas that could be used on the Tonight Show.  For instance, I used to enjoy photoshopping people’s faces so they looked really bizarre, and I would call this “Bonking” them.  Then that became a segment on the show, and also an app.

RP: Have you received any negative feedback from your personal creative content? How did you handle this?

HASKELL:

I guess I haven’t received a *ton*, but that’s just because I don’t think my content is viewed by enough people to take a strong stance on it.  And personally, I’m fine with that.  People online can be pretty brutal.

RP: What are your favorite apps or programs to work with?

HASKELL:

I like video editing.  I still use Final Cut 7 but will switch to Adobe Premiere once I have to.  I like making music on Logic.  I’d like to learn After Effects more – you can do a lot of fun stuff with that.  Oh, I also like Instagram because it’s fun to post dumb pictures.

RP: Do you have a regular website or media outlet you read that inspires you?

HASKELL:

Not one that I can think of specifically.  I often fall into the trap of clicking between tabs like Gmail, Facebook, Twitter, Instagram.  That sucks and is the opposite of inspiring.

RP: How do you get ideas for your project? 

HASKELL:

I sometimes get ideas from things that aren’t necessarily comedic.  For example, maybe it’s a drama that’s shot really well or has a cool song that makes you feel an emotion.  I like to get inspired from things like that.

RP: What project are you most proud of?

HASKELL:

Probably Real Big Boys, which I did with Dan Opsal.  We just made one web short a few years ago for fun, then decided to continue making them as a little side project. Making fun stuff with a friend? Now THAT’S what I’m talking about, baby!

13876416_10100177521577380_6415896261993766843_n
“Real Big Boys Creators” and writing partners, John Haskell and Dan Opsol, featured with 7  Blue-bellied Ingrim birds that Haskell rescued from his hometown.  (JK about the birds :D)


Check out Real Big Boys here!


If you want to be featured on a Royal Piranha Profile, tag us in your work and use the hashtag #royalpiranhaprofile


The Cameras Behind YouTube’s Top Vloggers

YouTube has proven to be the largest platform for bloggers to make careers out of posting videos, otherwise known as ‘vloggers.’ It has even launched some into stardom.

Yes, creative content and an engaging personality will take you a long way in this game, but in order to get your content seen, you need equipment.

There are thousands of articles online reviewing camera equipment and unless you have some sort of background in videography, all the jargon and stats can be overwhelming. Sometimes it’s just easier to look at someone who is doing well in the field you’re in, and emulate them. So we’ve got you covered…

Here’s a quick, no-brainer look at some of YouTube’s top performers and what they use to shoot their content.

VLOGGER'S CAMERAS-1

CAMERA PRICES:


Logitech HD Pro Webcam C920

Canon XA30

Pro Webcam C920

Canon EOS 70D

Canon PowerShot S120

Canon 5D Mark III

Panasonic Lumix GH4

Have you used any of these cameras? Let us know on Facebook! Tag us (@royalpiranha) on any work you’ve shot while shooting with these cameras, we would love to feature you.

A Film Permit Guide for the biggest cities in the U.S.

You have your actors booked, you have your crew locked in, you set a shoot date and your pre-production work is on point! You arrive on location EARLY, only to find out from an officer on patrol that you need a permit and now your shoot is shut down before it even started. We would never even wish this scenario on our worst enemy! So here’s a quick breakdown of city videography permit laws in the U.S.

1

When you DON’T need a permit:

  • Using a hand-held camera
  • Using a tripod
  • Handheld props or equipment
  • Using city sidewalks and bridge walkways are okay, as long as you are using a handheld camera.

When you DO need a permit:

  • Using prop weapons
  • Using actors in police uniform
  • Requesting parking privileges for productions vehicles

PERMIT COST: $300 FEE

SHOOTING IN AN NYC PARK: You will need to submit a request form 48 hours prior to shooting. This is free.

ADDITIONAL NOTE: In order for you or your organization to be eligible for a filming permit, Liability Insurance is required. A CERTIFICATE OF INSURANCE must be provided to the Office of Film, Theatre and Broadcasting 48 hours in advance of  your online permit application submission.

2

When you DON’T need a permit:

  • They say, “Generally speaking if it’s not for commercial use, you don’t need permit, otherwise you do.” It’s a little vague. Your best bet is to give them a call just to make sure.
  • CONTACT:  # (213) 977-8600 info@filmla.com

When you DO need a permit:

  • Select Location – Certain neighborhoods require different requirements
  • Secure Insurance– View list of insurance providers here
  • Submit Application
  • Conduct Outreach – The city suggests that you make production notices on company letterhead that describes what kind of shooting you will be doing.
  • Arrange Payment: They accept cash, money order, cashier’s check or company check but take note, some permit have some payment restrictions based on what permit you are asking for.

6

When you DON’T need a permit:

  • When shooting on private property

When you DO need a permit:

  • No matter the crew size or impact, if you are filming on public property in the City of Austin (like a street or park), a permit is required. This city has a different agency for every location! Below are some of the city’s main locations and their corresponding permitting agents.

REQUESTING PERMITS:

All permits also require insurance in Austin.

7

When you DON’T need a permit:

A Film Permit is not required for individuals filming or video taping for their own personal or private use, for employees of print or electronic news media when filming on-going news events.

When you DO need a permit:

Film Permits are generally required throughout Miami-Dade County for commercial film, video or still photo shoots that are conducted on public property.  Public property is described as: on roads and streets, sidewalks, or in parks, beaches or public buildings. To be sure that you do or don’t need one CONTACT: the Miami-Dade Office of Film and Entertainment at #305-375-3288.

Permit cost: $100.00 / 24 hour notice prior to shooting

REQUESTING A PERMIT: They have a one stop shop link for all their permits! Easy!

8

When you DON’T need a permit:

  • Filming for personal use and non-invasive shooting

When you DO need a permit:

  • Pedestrian activity will be interrupted during filming
  • Vehicle traffic will be interrupted on City streets during filming
  • Public parking will be reserved or impacted
  • A dolly, jib arm, light stand, generator, and/or other equipment will be used on a sidewalk, alley, or street
  • Wires or cables will be run across streets, sidewalks, or pathways
  • You are filming in a city park
  • Your footage/photos are for commercial use

PERMIT COST: $25/DAY

NOTES: Must apply for a permit at least 3 days prior to shooting, and if your film is higher impact shooting, you should register at least 5 days in advance.

STEPS:

1. Fill out a PERMIT FORM

2. Fill out a LOCATION FORM for each location you will be filming at

3. Must create a map of your filming locations like this: SAMPLE

4. When you are ready to apply, submit all forms as e-mail attachments to: filmoffice@seattle.gov.

CONTACT: Seattle Office of Film and Music #206-684-8993

 4

When you DON’T need a permit:

The City of New Orleans has a very hands on approach with their permitting and welcoming filming into their city. They offer a  one-on-one consulting session with City of New Orleans Agencies to troubleshoot any logistical issues before you start planning your shoot. They ask that you please contact the office as soon as possible to start planning your shoot.

4 STEPS TO OBTAINING THE PERMIT:

1. Applicants are required to complete a Filming Application.

2. Projects filming in Orleans Parish will be required to submit a Certificate of Insurance.

3. A signed copy of the Guide to Film Production in New Orleans

4. Confirmed location list and shooting schedule. All materials must be received no later than 3 business days prior to filming.

3

When you DO AND DON’T need a permit:

The film office says few permits are necessary for filming, but are required for federal, state-owned and tribal properties and lands. Permits are also often required for city properties, especially historical sites, public streets, as well as use of any county roads and state highways.

They also state that there may be additional environmental/conservation permits needed to film in New Mexico.

CONTACT: Sounds like your best bet is to call and talk it out with the New Mexico Film Office: #505-476-5600.

5

When you DON’T need a permit:

  • B-ROLL GUIDELINES: News crews, handheld interviews, documentaries, B-roll, and other low impact productions don’t require a permit, as long as it does not interfere with vehicular or pedestrian traffic.

When you DO need a permit:

  • Any filming in a public way such as a street, alley or sidewalk.

COST: $15/day

NOTE: Must apply no later than 3 days before the shoot.

STEPS TO APPLY FOR A PERMIT:

1. Complete an application and payment

2. Send the City Service Request form, Certificate of Insurance and Community Relations Notification (see below) to filmoffice@citychicago.com

*To create a Community Relations notification include this information:

  • Filming Notice to be listed the heading (see sample)
  • Production Company/Project Title
  • Dates/Times
  • Locations where no parking signs will be posted
  • Traffic Restrictions – list any street closures
  • Notification of Special Effects or Weapons on Set (if any)
  • Production Company Contact Name, Cell Phone Number and Email Address

CONTACT: City Hall at  #312-744-5000


3 Easy Ways to Shoot Stylized Videos with Your Phone!

Want to make your business’ social media content on Instagram and Facebook pop? Maybe you want to spice up your home videos?

Here are 3 easy ways to shoot with your phone to create some stylized videos.


SLOW-MOTION-2

SHOOTING IN SLOW-MOTION & TIMELAPSE:

If you have an iPhone, download the latest update for your phone (iOS 10.3.2, as of July 2017), then go into your camera and swipe right until you see “Slow-Mo” or “Timelapse” and begin shooting!

SLOW-MOTION:

Slow-motion videos showcase a particular action at a reduced speed in order to get a better look at it.  Like an impossible catch during an intense football game.  The faster the action is, the better the slow-motion is going to look.  Pro-surfer Keala Naihe uses slow-mo perfectly in this Instagram post:

TIMELAPSE:

Shooting timelapse shows the progression of something at a sped up rate.  Timelapse is great for when you want to show the process of a DIY project and reveal a finished look.  If you’re a parent, shooting in this mode is a perfect way to capture what your little bugger is doing in his crib during his alone time.  Here’s a video we shot of our son during one of his naps with our iPhone:


SHOOTING IN REVERSE:

Instagram now allows you to shoot videos in reverse. To do this: Go into your “story,” which is your circular picture icon at the top left corner of your screen.  Click it, then swipe right until you see “Rewind” and press the circle and shoot!  If you don’t want to publish it on your “story”, you don’t have to!  All you have to do is press “save” and it’ll save it inside your phone’s library.

Spike Jonze was famous for shooting his video “Drop” by The Pharcyde in reverse. Shooting this was quite the process.  Now we can do this with just one click of a button on our phones!  Crazy!  Check out his throw back music video shot in reverse:

Quick Additional Tips to Make Your Videos Look Better:

  • Shoot horizontally
  • Use a selfie stick as a hand held tripod
  • Hold your breath when shooting to get a steady shot


Upload your videos shot from your smartphones to Instagram and tag us @royalpiranha –  We want to see what you’re creating!

Your Digital Elevator Pitch

“Quick! Tell me what your business is all about in 30 seconds.” We’ve all heard of the importance of an elevator pitch.  Now, in today’s digital age, you need your elevator pitch VIDEO.

3 reasons why creating a professional ‘about video’ is key:


  • Including a video in a landing page can increase conversion by 80%
  • People spend on average 2.6x more time on pages with video than without
  • Online shoppers who view demo videos are 1.8 times more likely to purchase then non-viewers.

Fortunately for entrepreneurs, it’s easy to shoot and edit your own videos, which are crucial for continually engaging your audience on social media platforms. But creating a professional elevator pitch video is very important. Don’t skip out on lighting, editing and production for this one. This is the face of your company. Getting face to face time is harder in today’s age. People are more inclined to go online and see what you are all about. So you want to make a good impression.

Start developing your digital “elevator pitch” right now with these  key elements:


*Brand yourself. Make sure your brand clearly defines who you are. Sometimes creating your “about video” will shine a light on holes in your business’ overall branding.  Ask yourself is your name, logo, message and product or service all telling the same story? Your about video needs to do the same.

*Find your customer. Who are you selling to? Your entire video should use language that speaks directly to these people. Write down a personal profile of your target customer before starting to develop your video concept. Then write the script for your video in a voice that speaks directly to this person.

*Give value to your video. Unless the video gives something back to your audience, it’s useless. Your video should do at least one of the following: educate, entertain or solve a problem.

*Use the art of storytelling. Your video should invoke emotion. Your story, even if it’s a montage of moving images set to music, should have some form of a conflict, climax and resolution. Take your audience on a journey.

P.S. Make your digital story concise and sharp.  Your about video should be no longer than about a minute.

We are offering a free consultation for an ‘about video’ to all our readers. Visit us on our contact page and send us e-mail to set one up! Even if you aren’t shooting one with us, we’ll talk you through some ideas!

Share this on someone’s page you feel would benefit from a digital elevator pitch, tag us @royalpiranha, and we’ll give you and your friend 10% off any video service.

*Sources: (INSIVIA)(BLUECORONA)